Saturday, September 29, 2012

You Make My Life Brighter

Hi!

There is a new challenge at Creative Paper Trade that I am just getting in at the last minute.  My life has been full of busy, but I fell in love with these colors, so I am so happy that I am able to enter.  I received some happy mail today from Paper Smooches from the Sparks Challenge I won last week, so I waltzed ran to my crafty space to sit down and create finally with these beautifully delightful colors. 

Here is what I have to share tonight. I know the photographs are going to be dark since it was late afternoon when they were snapped. 
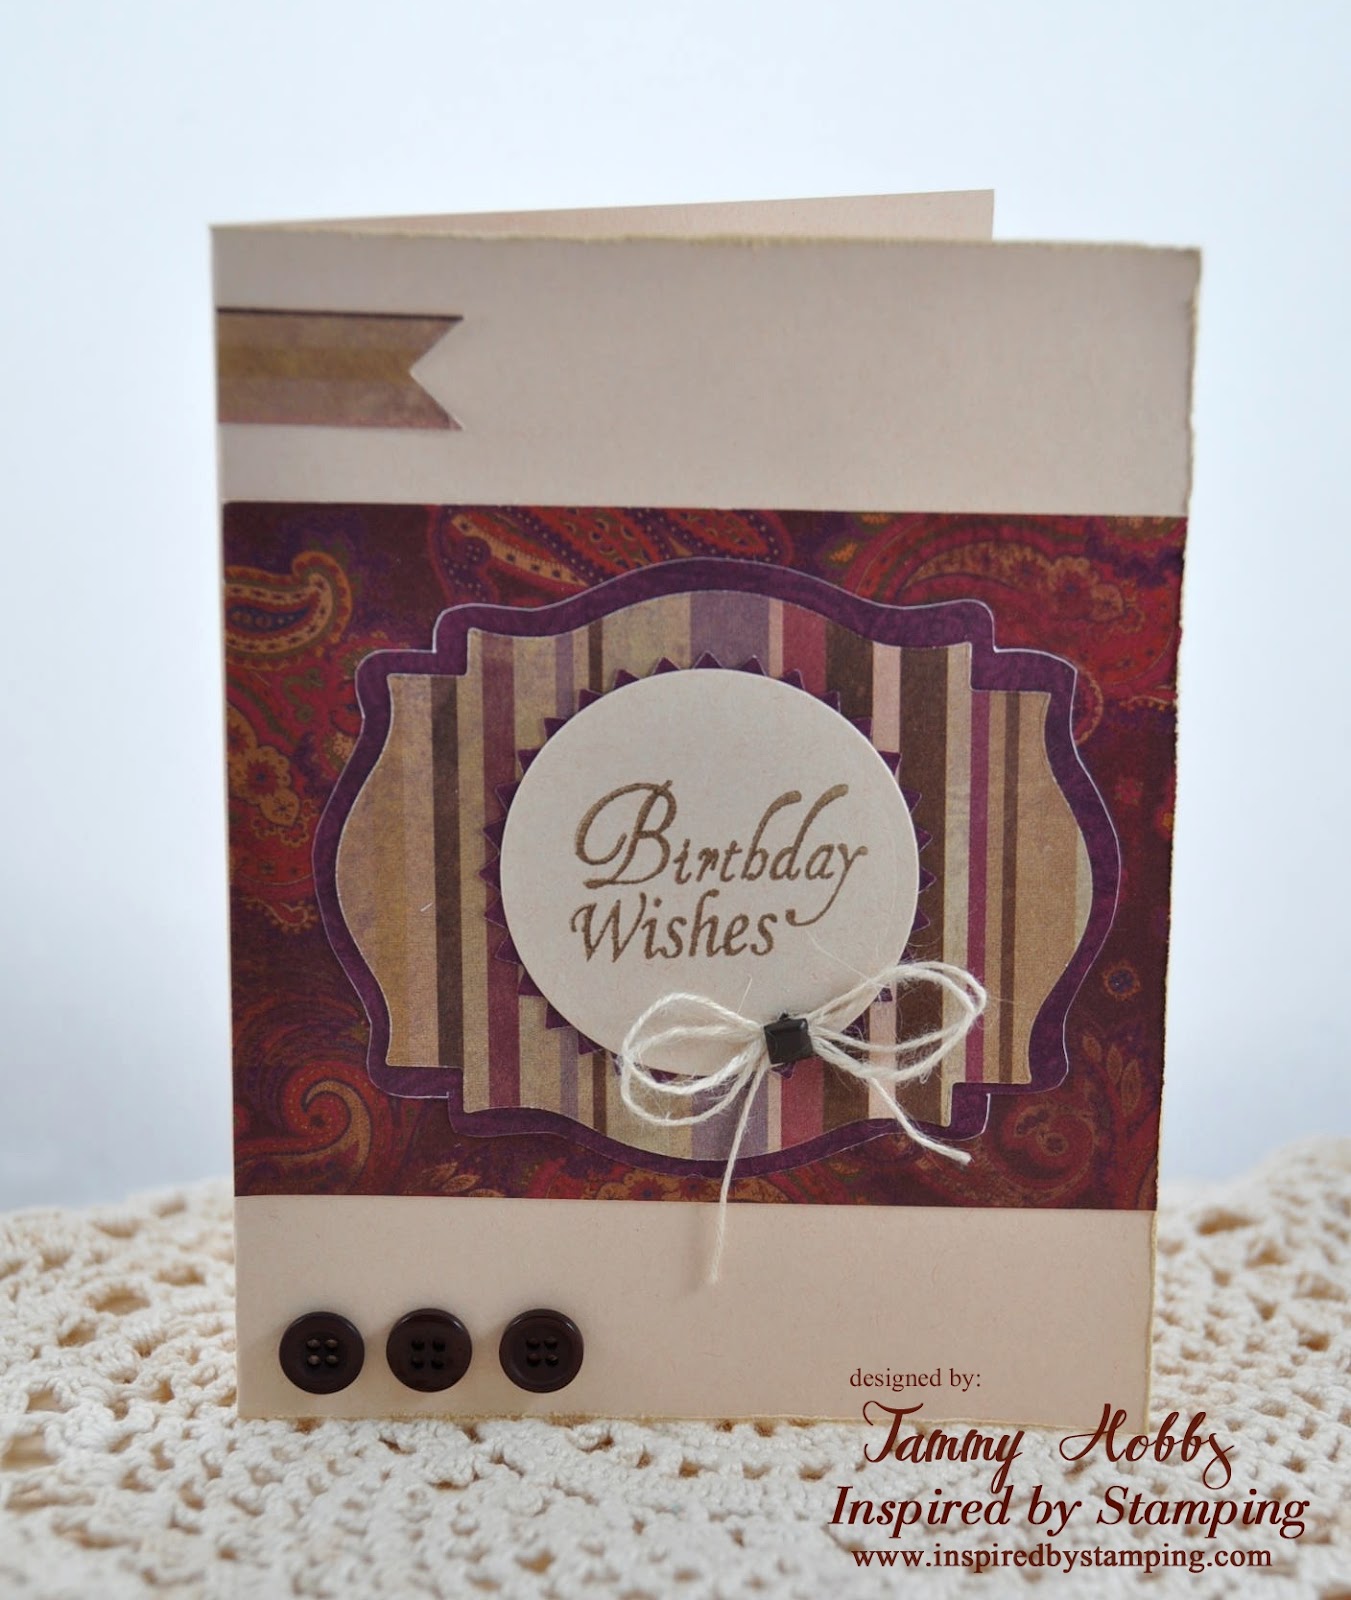
I had some fun papers in my scrap pile. I believe they may be all from the same company, but I can't be for certain. I worked with papers that I felt coordinated well together as well worked for the color challenge. I added a thin green trim of ric rac to the bottom.  A sentiment from Paper Smooches Giddy Bugs was added to the lower right in Tuxedo Black ink. I just love the fun font.  
A length of seam binding was wrapped around the upper portion of the card front and tied in a fussy bow and tied off using a button, twine and a tag stamped with a darling heart from the Giddy Bug set. The star of the show is the cute Giddy Bug herself! :-))) She has been colored in with pink copics and her cute friend the butterfly has been embellished with a yellow button and twine. 

As mentioned, I was inspired by The Creative Paper Trade. I was waiting at the Gates to play in the playground at Pixie's Crafty Snippet Challenge. I was anxiously waiting for the gates to open.
I hope you have a fantastic and wonderful rest of the weekend.

~Tammy~

Thursday, September 27, 2012

A Masculine Birthday

Hello Friends,

I am dropping in quickly to share a Masculine card.  I don't usually make a lot of masculine cards because they are not my favorite to create, but I have one to share today. I didn't go with a masculine "theme" so much as I used papers that would work for a Man.

The edges have been distressed both by ink as well as using an edge distresser. The focal sentiment comes from IBS Birthday Wishes which has been layered inside Spellbinders Labels 18 die-cuts. The patterned papers are from my pile of snippets from previous makes. A double twine bow was added below the sentiment. Three buttons are added to the lower left portion of the card for a finishing touch. 

I am happily adding this to Di's, Pixie's Crafty Snippet Challenge

I hope you have a great day!
~Tammy~

Tuesday, September 25, 2012

WMSC - Be Merry and Bright

Hello There!

**So Honored that this card was selected as one of the Top Mouse awards at WMSC on 9/29/12**

Thank you for stopping by! Ever since blogger did the force change, my email feeds have not gone out, and I have yet to figure out how to fix it. So I appreciate your visit. *Edit to note since I wrote the post...it looks like it may be fixed fingers crossed*

I have a Christmas card to share today. I had intended to have many more holiday cards completed by this time, but no such luck. 


I started with a light blue card base adding some patterned paper displaying a print of modern snowflakes. A strip of polka-dotted paper was layered on top adding a length of white crochet trim and a row of buttons laced with hemp twine.


A sentiment from Waltzingmouse Seasons of Love was added to the center of the white embossed frame from Very Vintage Labels 10.  A shabby bow was added to the top embellished with a button, twine and some sugar-coated jingle bells. 

It's been awhile since I have been able to join in at Waltzingmouse Sketch Challenge, (16 weeks to be exact)so I thought today was the day!  Here is the sketch which provided me inspiration.
WMSC116
It felt good to get another Christmas card completed!

I am also excited to share that I was blessed to be Featured at Paper Issues for my Nutty for you card.
Paper Issues Blog Design
as well as selected for the Pro Stamper Card at Paper Smooches Sparks challenge. I am truly honored.
Paper Smooches Sparks Winner 

I sure hope your week is going well so far!
Blessings and hugs,
~Tammy~

Monday, September 24, 2012

The Kraft Journal 89 - Clean And Simple

Hello friends!

*This is my second post of the day. For The Shabby Tea Room With Sympathy card click here or scroll down.*


Today The Kraft Journal is kicking off a Clean and Simple challenge this week.

I started with a Lunch Bag Kraft piece of cardstock adding a piece of patterned paper with fall leaves to the left portion of the card. Using Buff Ivory Cardstock I framed the Cornucopia from DeNami Designs and colored in with various Copic markers. 


For a finishing touch, I simply added the sentiment in the lower right hand corner and wrapped some green baker's twine around the card face several times tying off in a little bow. 

So that's it...easy peasy...CAS!

I am going to join The DeNami Designs Theme Challenge - Anything Goes
I hope you have a fantastic week!
~Tammy~

The Shabby Tea Room - With Sympathy

Hello~
Well, I have enjoyed my time immensely this month Guesting for The Shabby Tea Room, but with many things, all good things come to an end. This is my final post.
 I always have a hard time getting good photographs of white cards.  So as you can see from my card above that The Shabby Girls want you to create a card or project using WHITE as your main color (You may use cream, Kraft, Brown or Black as subtle accents)
Here is this gorgeous photo to inspire you with!  I swear I dream in white and if I didn't have boys in the house, I would so decorate like this with little pops of aqua perhaps.  This is just gorgeous! 

 Naturally, I started with a white card base. I created a white panel which has been embossed and had the edges distressed  and touched with some tea stain ink. I took some beautiful lace trim and added it to the center over a doily that has been cut in half. 

 I die-cut an oval and added my birdcage and With Sympathy sentiment to the center.  Adding some embellishments of pearls a double bow, and white paper roses to complete the look.
Please be sure to stop by The Shabby Tea Room to see the wonderful inspiration they have for you!  I also want to say thank you to Debbie for giving me this opportunity to be guest designer for the month of September! 
I hope you have a crafty day!
~Tammy~ 

{Recipe}
Paper: CS: Stampin' UP!
Ink: Momento and Palette
Other: Pearls: Michael's, Flower: Stash, Ribbon: Offray, Crochet trim: Offray

Friday, September 21, 2012

Hey Chickie in a flash or is it dash????

Hey,

**Woohoo So Happy My fun little Chickie card was a favorite on the 10 Minute craft Dash...quite the honor considering I can NEVER make a 10 minute card thanks ladies for liking my card I am honored**

Well, I had no more than 10 minutes to spare today on my papercrafting hobby. It was a full day, so I retreated to the crafting space to get it out of my system I guess. :-))) It's hard for me to create quickly and create CAS, but here it goes.
With a white card base as a starting point. I used the 10 minute craft dash colors as my inspiration and knew which paper stack I owned to work from. I added a strip of patterned paper to the bottom adding some pink twine just above. It was one of the things that almost tripped me up as well as the twine bow on Miss Chickie's head. The twine didn't want to stay nor did it want to lay straight! 

I stamped Miss Chickie and fussy cut her out and added her to a punched scalloped circle and trimmed the edge. (I figured it would be faster to punch my shape rather than mess with die-cutting). I tied a tiny twine bow and added a pearl to her head. All that was left was to stamp the sentiment. 
My old school smart phone with sticky prints from little sticky fingers! :-)))
As you can see, I almost didn't make the challenge time. It opened my eyes as to how fast 10 minutes goes.

As mentioned, I used the 10 Minute Craft Dash as my inspiration.

Card Makin' Mama's : Be Punny

It was hard for me to not add more, and I very well may have if there had been more time.

Thanks for letting me share my quick make with you. I sure need more practice at CAS and timeliness! :-)))
Have a fantastic weekend,
~Tammy~

{Recipe}

Stamps:  Paper Smooches: Chubby Chums
Paper: Stampin'  UP!, DP: Cosmo Cricket
Ink: Momento: Tuxedo Black
Other:  Twine, Pearls

Thursday, September 20, 2012

IBSIC #27 - Grateful

Hello friends!

Sharing a fall card on this lovely day! 
I know ya'll are probably tired of hearing me say this, but I started with my stash pile from other makes. I seriously have a huge pile of scraps from over the years. If only I had more time in my day to organize them. *sigh*. 

I began this card by piecing together the pretty falling leaves paper to my red gingham, checked, patterned paper and adhering to my Buff Ivory card base. Some lace trimmings and pretty fall striped ribbon was added to the center along with some buttons and pearls.  Using a piece of vintage book print from a thrift shop find, I die-cut a scalloped oval.  For my focal images, Using a background stamp, I stamped two different background images on Buff Ivory cardstock and then used a pumpkin image to stamp over the background which was fussy cut.  At the upper right corner of the card face, a sentiment from was stamped in a hand-cut banner.
For a finishing touch, I added some beautiful maple leaves made of mulberry paper to the focal image dressing up with a tangerine button, pearl, and a twine bow. Using the same striped coordinating ribbon, I tied a bow adding a chocolate brown button to the center with some hemp twine. 

I am also submitting this card at The Ribbon Carousel Fall into Fall and Pixie's Crafty Workshop- Using those scraps.
I hope you enjoy your day and get some crafty time in!
~Tammy~

Wednesday, September 19, 2012

Nutty about You!!!

Hey there my crafty friends!

(Edit to note: this card was featured on Paper Issues Blog! Thank you I am so honored...well, I am now DOUBLY honored as this card was chosen for the Sparks challenge winner of the week.)

I have a post that is just about having a little crafty fun! I stole some time today to just have fun and be crafty and {gasp} ink up some stamps I had not used yet. I hate to admit it, but there is more in this category than I care to share, but if there were only more hours in the day. This was a purchase made with birthday money back in February! See what I am sayin'! 

So here we go!
I just think this acorn from Paper Smooches Falling for you is just too cute and when I saw the Cool Shades SPARKS challenge this week I couldn't resist using it as my inspiration.   As always, I used pieces and parts from my beloved scrap pile. 

I started with Lunch Bag Kraft card base leftover from another make and also used this to create my tag. I love this stuff! :-)  I paper pieced that cute little darling of an acorn and placed it on some fun patterned paper that coordinates with the card front.

A banner was created to decorate the top of this card and embellished with pearls. A length of brown satin ribbon was wrapped around the center of the card and tied off in a double bow decorated with a pretty resin flower. 

As mentioned, I gained some creative inspiration from the Cool Shades Sparks challenge at Paper Smooches. 
Here is the color story.
Also joining in at Paper Issues: Tag your it, and Pixie's Crafty Snippet Challenge: All created from snippets. If you create a card from scraps you should link up. 

Hope you have a wonderful Wednesday!
~Tammy~

Monday, September 17, 2012

The Kraft Journal 88 - Lavishly Layer


Hi There!

(This is my second post of the day. For the Shabby Tea Room Guest Design project please click here)


For this week's Lavishly Layer challenge, created a Halloween layered card using some fabulous black and kraft patterned papers that can be found here in The Kraft Outlet store.  A card base of Lunch Bag Kraft was used adding those wonderful layers of Black and Kraft patterned papers.  The glittered witch and sentiment from Making Memories was added to Buff Ivory Cover Weight Cardstock that has been die-cut in a circle to nest perfectly in her scallop circle made from Lunch Bag Kraft . 


I hope you play along the Lavishly Layer challenge this week at  The Kraft Journal.  All those that participate in our challenges for the month have a chance to win a $15.00 gift certificate from The Kraft Outlet....and you also get a chance to be considered for The Feature Me Friday artist post on The Kraft Journal blog! 

Further Inspiration was found using Sweet Sunday Sketch.


Thank you Melissa for sending me to Mark's Finest Papers - Autumn Fall Challenge
~Tammy~

The Shabby Tea Room - Pretty Party

Hi there!

Well I only have two more post to share with you for The Shabby Tea Room! It's been wonderful having this opportunity with The Shabby Tea Girls this month! 

Let's get started with today's post.
This week we ask you to create a card or project inspired by the inspiration photo (below) and use Pink, Green and Flowers. 

I started with a green card base (not sure of the color name due to being in my scrap file), but I can almost bet it's Stampin' UP!  When rummaging in my scrap box, I found the perfect piece of patterned paper that worked well with the colors in the photo. 
I took a page from a memo book, and added to the center of my patterned paper. A butterfly was die-cut using a Sizzix die. Next I painted distressed and added glitter for a finishing touch. A green prima flower was added to the center and both were attached to the center of the memo page.  Some carnival tickets from my stash were added and final embellishing touches include a row of buttons, a shabby seam binding bow that has been embellished with white roses and stick pins. The sentiment is from Paper Smooches - Good Gab.

Don't forget to head over to The Shabby Tea Room to see all the delightful creative inspiration from the design team. 

I am joining over at Pixie's crafty Snippet challenge.  We will see if I can get a turn going down the slide this time. 

Hope your day is a crafty one. I will be back in a few hours with this weeks The Kraft Journal post. 

Till then!
~Tammy~ 

Saturday, September 15, 2012

Inspired By Stamping September Post Release Review

I am back with my post release project review for the Inspired By Stamping September release. What fun stamps being released this month to get you in the upcoming fall / winter holiday spirit! 
I am just smitten with these interchangeable pumpkin faces and bodies! :-)))) I pieced together some fun Halloween patterned papers from my stash and added to a piece of Warm Brown Cover weight cardstock. I used a Halloween Journal card in my stash to add the fun glittered date which was attached to my card front at a slight angle. A tag was created using some Halloween text paper and Martha Stewart orange glitter was added using my handy dandy glue pen.  5 black buttons were laced with twine and added to the tag for an embellishing touch. Mr. Pumpkin was created by stamping his body and face on some patterned paper that I have had for years. 

I am joining the gals over at Pixie's Crafty Snippet Challenge 

Thanks for visiting. I hope you all have wonderful plans. I am off to the soccer field. Hopefully this one won't get rudely interrupted by Mother Nature. 
~Tammy~

Friday, September 14, 2012

3, 2, 1 Happy Birthday

Hi!

(This is my second post of the day...to check out my Merry Monday/Inspired By Stamping Happy Holiday card click here)


A very quick post as I have to get out the door... Let's just say my week has been hectic with appointments, obligations, volunteering, and all the short stuff activities that keep the roads hot.

My son is invited to a birthday party tomorrow, and well {gasp} I had just resided to the fact I was going to have to pick up a store bought card.  He looks at me this morning with big eyes and said, "We're BUYING a card?" So with that said, arm twisted a mad dash to the craft room took place and I hit the scraps running! I seriously used the top two pieces of scrap patterned paper in the pile and went from there using the 3 2 1 challenge at Shopping our Stash as well as the Sparks Designers Draft Challenge at Paper Smooches. This card took me about 9 minutes. If ya'll know me well enough I have stated many times I am the slowest cardmaker ever, so the fact that I made a card under 10 minutes is nothing short of a miracle. 

I started with a piece of textured cardstock that was leftover from another make and added a white panel to the card front that has had strips of Washi Tape added to the left side of the panel.  The Zebra from Paper Smooches Zoo Crew was stamped on some yellow striped patterned paper and fussy cut then added to my scallop die-cuts.  A button which has been laced with twine and tied off in a bow was added to the left side of the zebra. 

All that was left was to add the Happy Birthday sentiment from Paper Smooches Party Possse.
As mentioned, I gained my inspiration from Shopping Our Stash 3, 2, 1. I used 3 Washi Tapes, 2 Patterned Papers, and 1 Button.
The layout was inspired by the Sparks Designer Draft.
Thanks for stopping by for a visit and peek!  I hope you have a fine Friday!
~Tammy~

Inspired By Stamping Release - Happy Holidays


Hi There!

I started with some bright and fun Christmas patterned paper and added to my white card base.  I added three panels on the left side using some fun washi tape which has been cut at various lengths. A snowflake was die-cut and embossed to provide a decorative base for the sentiment which was stamped using the scotch tape method. Finishing touches include some fun candy canes, decorated with a white button and red twine bow.

For some inspiration, I used the sketch from Merry Monday

Make it Monday - Anything Goes
Thanks for joining me today. I will be back tomorrow with a recap card from the release.
~Tammy~

Thursday, September 13, 2012

Inspired By Stamping September Sneak Peeks

Hi! 


The first card I have for you today is using a christmas stamp, but as you can see below, I did not make a "Christmas" card. October is Breast Cancer Awareness Month and we all know someone who has been touched by this.  I wanted to create a card to celebrate all cancer survivors and honor the memory of those that have passed. In this case, I am getting more bang for my buck by using the stamps for things other than Christmas here.

I chose to create a 5 x 5 card and really wanted the focus to be on the message, so I kept  it fairly simple. I started with a white card base adding another white panel  to the center of the card front that has been randomly stamped using a doily. Using Angel Pink ink, I stamped inside my die-cut circle the hash mark ring which is from the soon to be released Halloween tags set and completed the focal image with the Hope sentiment. For a finishing touch, a pink ribbon was created embellishing with a button.


Being a military spouse, I know what it's like to have a loved one away often more than I care to think about, so I created a Welcome Home card with a patriotic feel.

I took a panel of red patterned paper and added it to the center of my Buff Ivory Coverweight Cardstock.  At the top, two scallop borders were cut from navy blue stars patterned paper. Red and white buttons were added as a decorative touch.

A star was cut from burlap and added to the center of the card to serve as my focal image for the Welcome Home sentiment that was created.  A final decorative touch included some beautiful blue rhinestones.

I created some mini grocery bags using Lunch Bag Kraft to display these fun little sayings. They are the perfect size to hold little treats at Halloween.  These are easy to whip up and could make darling little treats for the neighborhood kids, school classmates and staff....how about a Halloween party?


I will be back tomorrow with another post! Hope you will come back by!
~Tammy~

Wednesday, September 12, 2012

Paper Sweeties Fun Wishes

Hi!

I am over on the Paper Sweeties blog today with another creation using Emma in celebration of their second release that is just a few days away! I won Miss Emma and one of her sweet outfits during the launch of Paper Sweeties last month. They are adorable and so fun to paper piece! :-)

I started with a cream card base and piecing together the pink stripe and aqua polka-dot patterned papers from my scrap pile.  A paper doily was added to the center of the card front adding a strip of yummy tickets.  A row of chocolate buttons were added to the bottom of the tickets. 

 Emma was paper pieced with some fun papers hanging out in my scrap pile. I used colored pencils and mineral spirits to bring her to life. Her pigtails were adorned with some pretty pearls! Finishing touches include a die-cut heart made from burlap, beautiful pink and aqua flowers and some leaves that have had a touch of glitter added for a little extra sparkle and shine.  The sentiment "Fun Wishes" from You Are Fabulous was added to the lower left corner for a finishing touch. 

I am also joining over at Pixie's Crafty Snippet Challenge. More goodies from the stash pile.
My Mum's Craft shop - Buttons

Be sure to check out the Paper Sweeties blog for the latest on these cuties! 
Have a wonderful Wednesday!
~Tammy~

Tuesday, September 11, 2012

Paper Sweeties Blog Hop - Have a Beautiful Day!

So glad to have you along on the Paper Sweeties blog hop with  My Time Made Easy ™ LLC


9/11
Today is a day of remembrance, and a time to thank all of those who have served our country. Past, present and future, the words ‘thank you’ don't seem to be enough. Many people have given so much of themselves, to work tirelessly to preserve our freedom and protect our country.

Today on 9/11 we take a moment to remember those who lost their lives that tragic day, and the families they left behind. We take another moment to honor all of the individuals who helped that day, and who are, or who have served our country. Today we remember.

In honor of all these individuals and their families My Time Made Easy ™ LLC and Paper Sweeties has organized a Blog Hop with *NEW* products & projects to inspire you to create gifts for our Troops, or that special someone!


My Paper Sweeties creation had to be Patriotic as we reflect on this tragic day 11 years ago that I know will forever be etched in my memory.  

I have used Paper Sweeties Emma! Isn't she lovely?  I started with a Lunch Bag Kraft card base and added some white paint for a shabby touch. I pieced together a wonderful collection of papers from my stash that works well for this Patriotic little number. I then added some eyelet lace trim in white to the center of my card front.  A length of red polka-dot ribbon was wrapped around the card face and tied in a bow embellished with a white button which has been laced with hemp twine completed in a double bow. 

I then took a paper doily and added a Lunch Bag Kraft circle to the center and adhered to the left portion of the card embellished with one darling papercrafted Emma and red, white and blue buttons to frame her with!  A patterned paper fan rosette with button was added to the lower right portion of the card. 

Last, but not least, a hand-cut sentiment banner was created using the scotch tape method for customizing your stamps.  

Thank you for joining along with us for this special commemoration blog hop ! I hope you have enjoyed your visit!

Please see what all the following designers have made using the *NEW* products:
·  Lauren Meader – owner My Time Made Easy
·  Lisa Kind
·  Tina Hale
Debbie Marcinkiewicz – owner Paper Sweeties
Additional designers:
Tammy Hobbs  (That's me)

I was personally inspired and adding this to Your Next Stamp element challenge. Pixie's Crafty Snippet Challenge.
I hope YOU "Have a Beautiful Day"
~Tammy~