Thursday, July 26, 2012

Giggle and Laugh

Hi!

I hope this finds you doing well on this fine Thursday and having a good week!

Using my favorite card base ever Kraft *smile*,  I painted it using some white craft paint. I added a Whisper White panel which has been stamped using various stamped frames.  I took inspiring sentiments that would put a smile on the recipient's face inside some of the frames.
A heart was cut from Kraft cardstock and then I ran it through my crimper to give a corrugated cardboard look finishing off with a touch of paint. A partial doily was added to the bottom embellishing with some beautiful paper blooms and leaves. 
Lastly the edges were distressed and some tea stain ink was applied. I hope my little share today made you smile.

I am also joining along over at The Kraft Journal - Make Me Smile. 

I hope you have a wonderful day and will join along in all the fun!
Thanks for visiting! It makes me smile!
~Tammy~

Saturday, July 21, 2012

Merry Christmas with Merry Monday

Hi!

I snuck in some crafty time just for fun! I have really missed playing along with the Merry Monday and Colourq challenges, so this week was the perfect time to combine them both. 

For the month of July, Merry Monday's challenge you can use any past Merry Monday sketch. Here is my card using a Merry Monday Sketch and the colors at Colourq.
All of the stamps are from Crafty Secrets Vintage Christmas except the sentiment which is from DeNami Designs.  
I adore this Father Christmas image that comes in the set. I used Vintage Sepia ink on Kraft to complete the vintage feel.  I punched a snowflake out of some black with white polka-dot patterned paper and added it to a pretty glittered flower embellishing with a dew drop and twine. 
Here is the sketch I chose to work with.
Here are the Colourq colors. 
I hope you have a wonderful weekend!
~Tammy~

Thursday, July 19, 2012

Happy Anniversary - IBSIC 18

Hi!

I have an Anniversary Card to share with you today! 

I started with a Lunch Bag Kraft card base from The Kraft Outlet and added my patterned paper (g.c.d. studios) to the card front.  I added a length of crochet trim that has a ribbon weaved down the center.  Lots of layering using some Spellbinders dies to create my take on the sketch.
 Finishing touches include pearls, a flower and leaves from my stash.

Here is the sketch!
I am also joining over at The Kraft Journal - Anniversaries and Weddings.

Have a terrific Thursday!
~Tammy~
{Recipe}
Paper: CS: The Kraft Journal, PP: g.c.d. Studions
Ink: Stampin' UP! : Chocolate Chip
Other: Pearls: Michael's, Flower: Stash, Crochet trim: Offray

Tuesday, July 17, 2012

Big Hugs...

Hi!  How are you all doing?  I am still trying to climb out of a big ol pile of catch up! We are enjoying the lazy days of summer, however not so lazy on our end. So having said that, I apologize once again for not getting around to your lovely crafty blogs!

The Cupcake Craftroom is sponsoring Tuesday Morning Sketches this week, and the Design Team was asked to play along. 

Here is my card using papers from the Flourish Collection.  I always like to be slightly "different". *wink*
I made a tall card as my take on the sketch! Ever so often, I will pull myself out of the routine of making a standard A2 size card.  I started with a kraft card base adding some white paint for a shabby touch. 

Using some material I had on hand, I created a flower embellishment adding a button and blue rose to the center. 

I took a Library card pocket and covered it with the solid light blue papers from Cupcake Craftroom adding a rectangle of the polka Pastel Blue to the center distressing all the edges.  I paper pieced a pitcher using the Flourish paper in pink embellishing with a button and pearl. Some Crochet Trim was added to the bottom of the focal image on the library pocket for a finishing touch. 
Inside the pocket, I have created a sentiment tag with Flourish papers. 
I love this Flourish line! It is so pretty and fits my style! All of the papers you see here come in one collection and you get more paper patterns and colors than I have displayed. I believe there is over 60 papers in this collection. You can print them out as much and as often as you like! Love that! 
Here is the Tuesday Morning Sketch. 
I am also joining in at Dynamic Duos.
Well that is it for me. Hope you join along the fun if you have a chance. 
Have a terrific Tuesday!
~Tammy~

Saturday, July 14, 2012

Altered Cookie Jar

Having gone to a store recently, I was shocked to see fall decor and what shocked me more was when I went further in the store and they had aisles and aisles of Christmas out already! Well that got my gears turning for today's project.

 At the holidays, lots of baked goods get exchanged, so I prepared my first homemade gift idea for the holidays. A jar was decorated with some pretty patterned paper adding a wide Christmas ribbon. 

I decorated the top of the jar using patterned paper and stamping a doily on a die-cut flower which has been layered on top of a snowflake. 

All that is left is to bake your goods and include the recipe if you desire.  I decorated my recipe card and stamped a Doily in the upper right corner.  I stamped it once on scrap paper then I stamped it next directly to the recipe card so that the image was subtle and you are able to read the recipe clearly. 

I am adding this to Cards Crafter's Circle - Christmas in July

Hope you are enjoying your weekend! Thanks for popping over!
~Tammy~ 

Friday, July 13, 2012

You're My Cup of Tea!

Hi all....Happy Friday the 13th! :-))))


Starting with a Kraft card base I added the pieced patterned papers. The blue papers and the top pink are from Cupcake Cards and Crafts the pretty lattice paper is from my stash.  I cut a scallop border from the pretty blue polka-dot patterned paper and added it to the upper portion of the card front.

A length of white grosgrain ribbon was added horizontally to the center adding a pink button and a foam glittered heart to the center further embellishing with a memory stick pin. 


A heart was die-cut using a leftover piece of white card stock and then run through my crimper adding some pink craft paint and tea stain to the edges. A heart doily was added to the left portion of the card front placing the crimped heart on top. 

A darling tea cup was paper pieced and added to the center of the heart embellishing with a pink button and paper roses. 

The finishing touch includes adding the beautifully script sentiment. 


Inspiration for my card was found at The Ribbon Reel - use the colors in the photograph plus use a heart, sparkle and ribbon.
Thanks for visiting with me!
~Tammy~

Thursday, July 12, 2012

Monogram Cards and More

Hello Blogaritas! 

(For my Spiral Tissue Tutorial click here.)

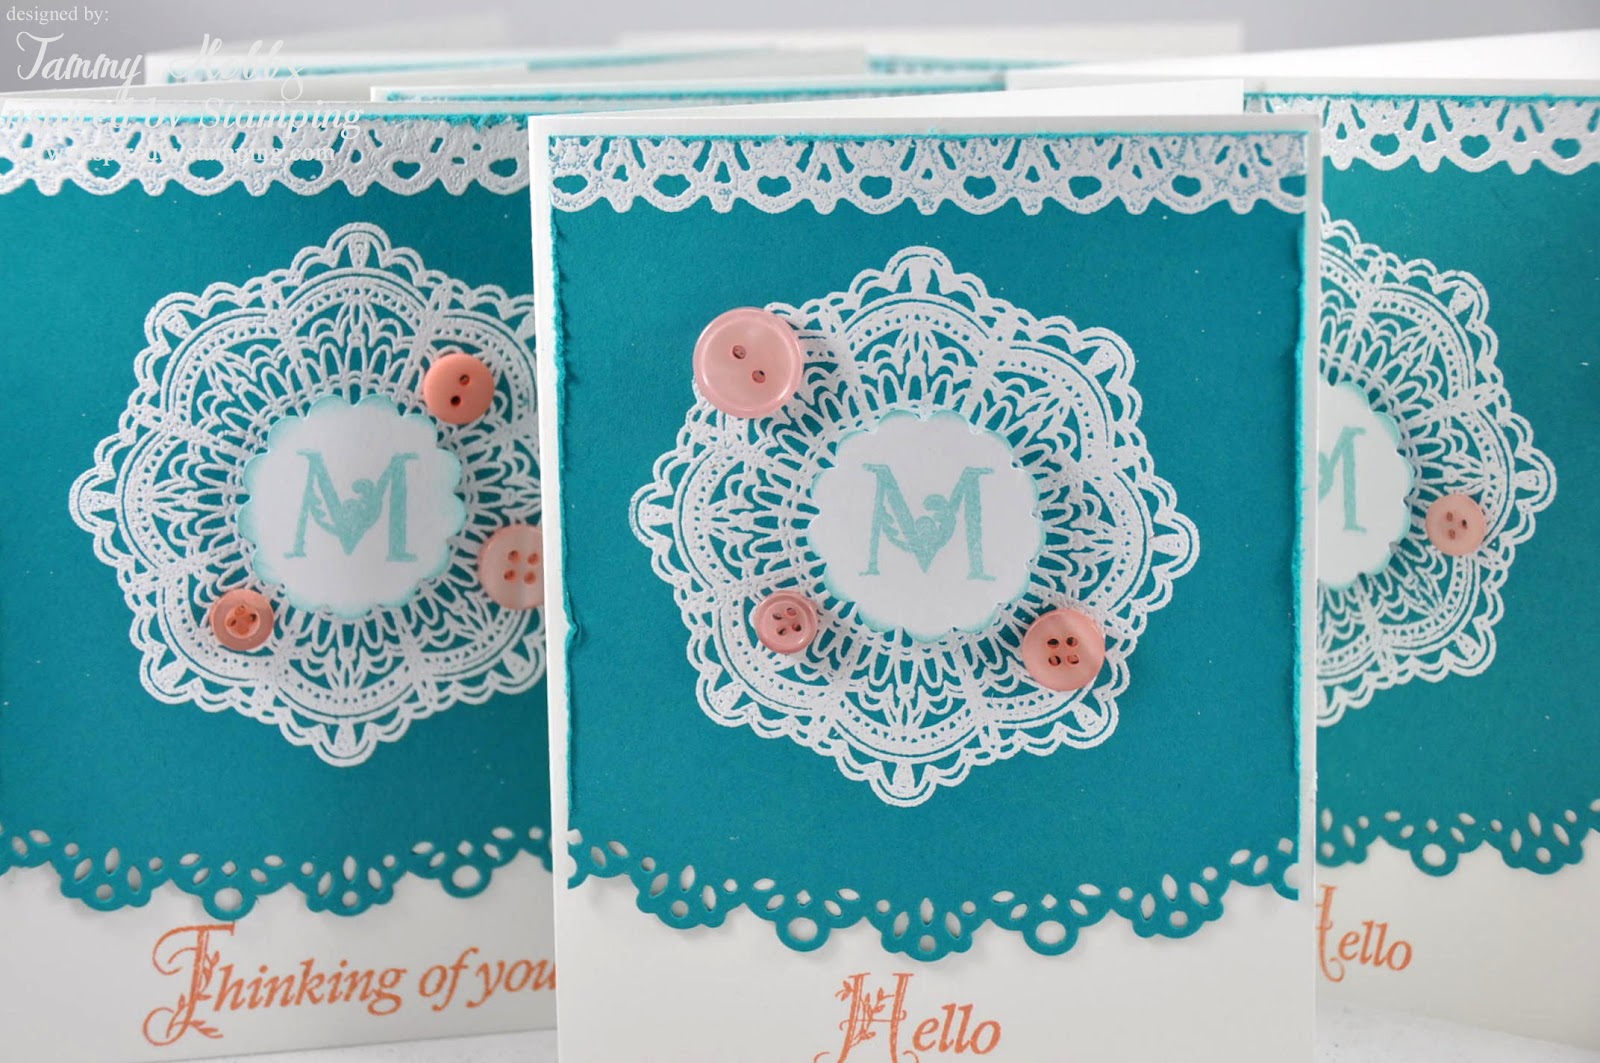
Up first is gift set using Fancy Alphabet, Heartfelt Greetings, and Delicate Doilies II!

Here are the cards stacked out. I kept this set fairly simple so it will fit nicely in the packaging as well as make it easy to fit inside a standard A2 Envelope.
Two sentiments were used from the Heartfelt Greeting set to give the recipient a variety! The Monogram initial is from Fancy Alphabet which some of my teammates gave you sneaks of yesterday.   The initial was stamped and a 1 inch scallop circle punch was used to pop it in the middle of the beautiful doily from Delicate Doily II which has been embossed with white embossing powder. The white border at the top also comes in the Delicate Doily II set and has been embossed as well. I love how the White pops off the teal card stock. 

Here is a picture of the packaging! A band was created to coordinate the note set. 

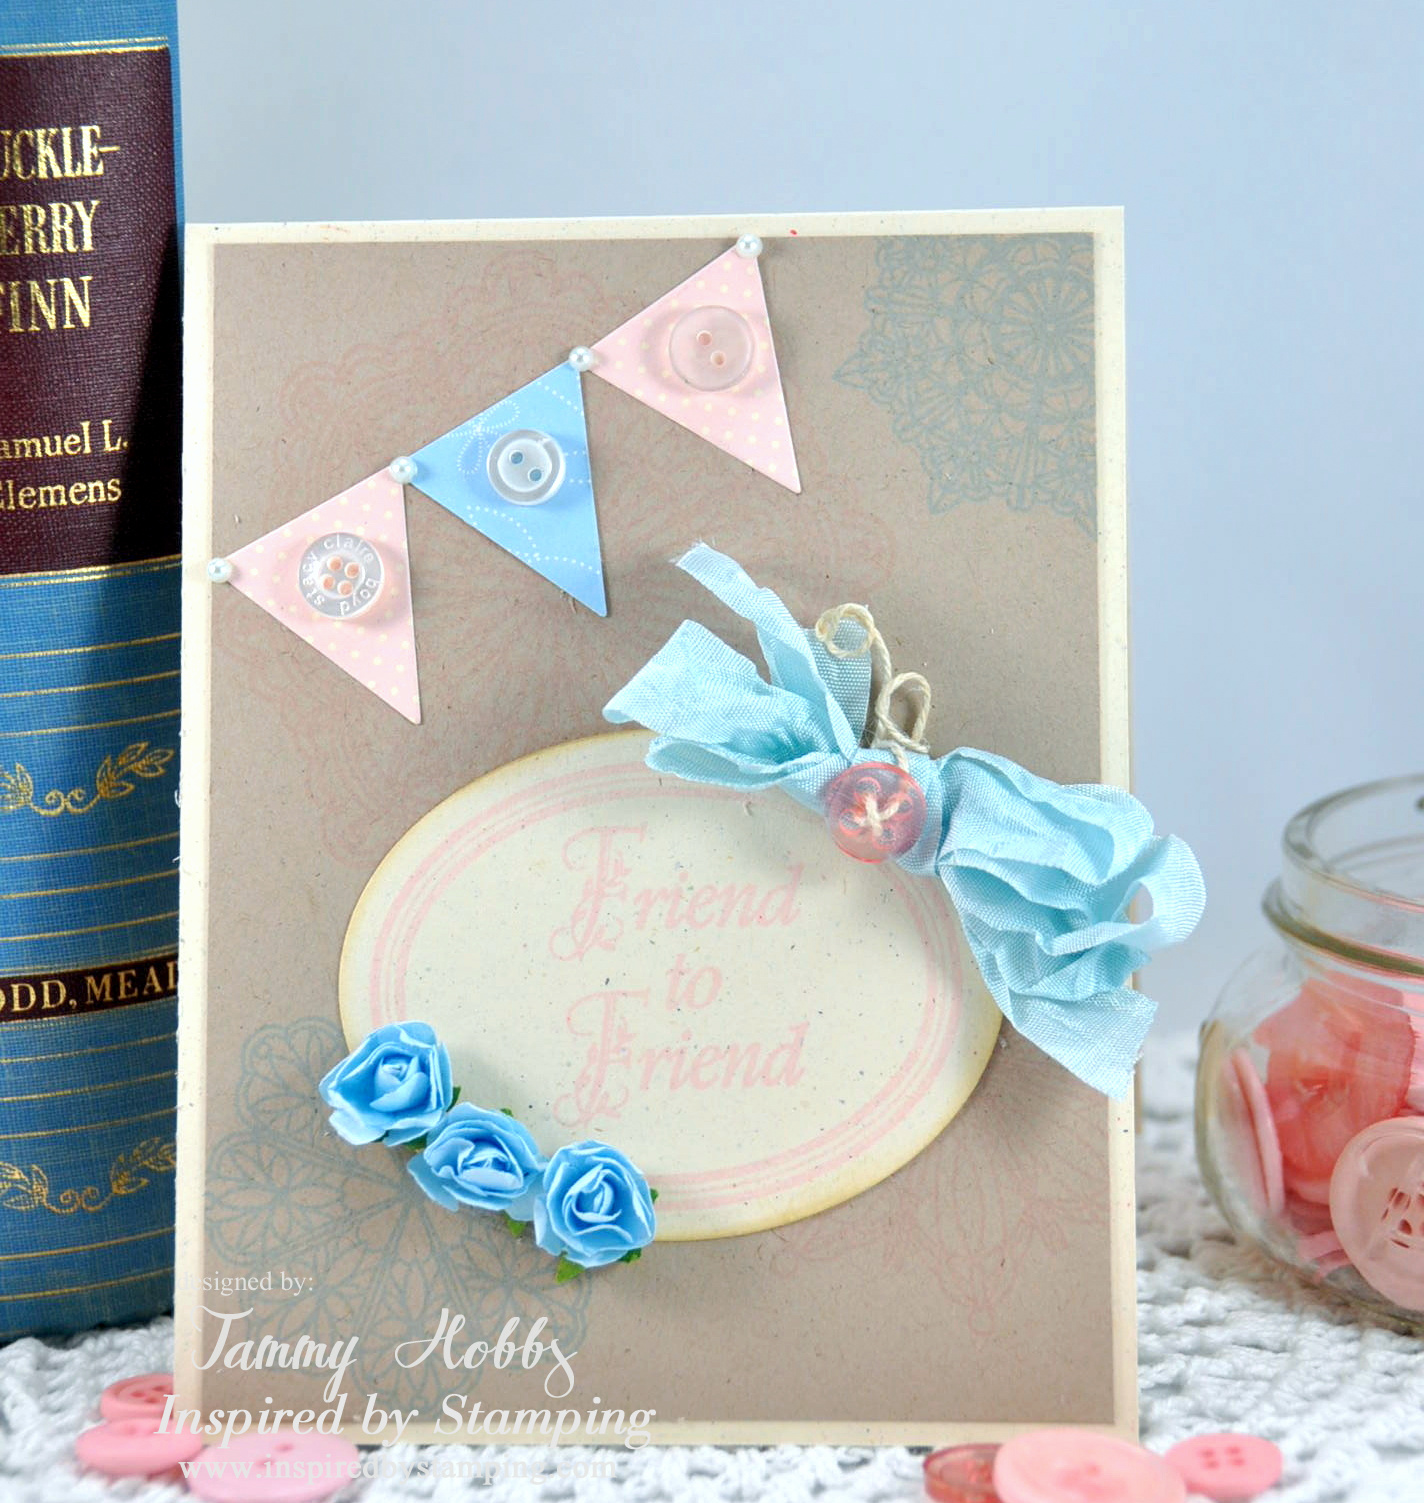
Up next is a soft and sweet card displaying Delicate Doilies II, and Heartfelt Greetings! The oval frame is from the wonderful set Paris. 
I started with a cream card base and added a Kraft panel stamping the various doilies in a soft Angel Pink and Sky Blue All that is left is to embellish a bit with a banner, buttons, pearls, paper roses, and a seam binding bow. 
The next card features colors I don't normally gravitate to. From time to time I like to challenge myself to work with colors in my supply stash that often get overlooked. 
I started with a coral card base inspired by the die-cut.  Lemonade yellow craft paint was added to the card base. A piece of white card stock was stamped using images from Delicate Doily II to create my own background paper! 

A length of white crochet trim was added to the top portion of my card front. Next I wrapped a length of seam binding vertically around the right portion of the card front tying off in a fussy seam binding bow adding a button, twine and a sentiment tag (Little Phrases) for an embellishing touch. 
A final embellished touch consisted of a butterfly chipboard that has been painted Lemonade yellow and then sanded finally adding some coarse glitter. 

Here is my final project for today. It uses various colors of pink and kraft which make my heart go pitter patter. 

I started with a lunch bag kraft card base which has had a touch of paint added to it.  Next I took my patterned papers and pieced together to adhere to the card base adding some delicate eyelet trim. A length of hand dyed pink seam binding ribbon was added to left portion of the card tied in a fussy bow. Various Spellbinder die cuts were added to serve as a focal panel displaying Delicate Doilies II and a sentiment greeting from Heartfelt Greetings. The Eiffel Tower (Paris) was stamped in Versafine Vintage Sepia adding tea stain to the edges to complete the look. Final embellishing touches include pearls, paper flowers and a hand made rolled tissue flower

Hope you have an inky day!
~Tammy~

Wednesday, July 11, 2012

Tissue Paper Spiral Flower Tutorial

Woohoo Wednesday
Tissue Paper Spiral Flower Tutorial


I have a little tutorial to show you how to reuse that tissue paper leftover from gifts.

My tutorial today will show you using white tissue paper many of us have, and how to add color to get a fun effect. I have made projects using colored tissue paper for a brighter embellishment.

So first gather your supplies you will need…
You will need:
Tissue Paper
Scrap card stock
1 inch hole punch
Glue
Embellishments
A misting spray (i.e. Tattered Angels, Mr. Huey’s etc)
A box (not pictured)

To start take your tissue paper and cut strips about 12 inches by 1 inch and layer them and fold in half. *This step is optional, but I like mine wrinkly, so I balled mine up and then lay flat again.

Take the stack of tissue paper and twist.
Do this all the way to the end.
Next is the fun part!!!  Take your twisted tissue paper and place in a box. (I have used an old shoe box)


Mist the tissue paper till you get the desired color.
Starting at one end take your twisted misted tissue paper and roll in a spiral.
Take a one inch circle punch and your scrap cardstock and punch out your circles to glue your flower to for stability.
Next your flowers are ready for embellishing.
The only additional step I have taken is to die-cut some leaves which I have misted with a light green.
A Close Up! 
Hope you will give these a try to embellish your next papercrafting projects! Drop me a comment if you do, I would love to see your creations.
Have a great one! I will be back tomorrow with some sneak peeks for the July Inspired By Stamping release.

I am personally adding this to the Playing in Paradise - Wedding/Anniversary challenge.
~Tammy~

Sunday, July 1, 2012

July Cupcake Craftroom Layers Challenge

Hello There!
Welcome to July's Cupcake Craftroom monthly challenge!  This month's Challenge is 
layers. We want to see you pile it on. 
Layers can be matting and layering, 'piling it on', adding elements and image toppers, building up different papers, layers of a border...the possibilities are endless.
I have used some new papers that are now
available in the Cupcake Cards & Crafts store called Flourish.
It's an elegant paper line, and I love it!!!
I started with a white card base and pieced together the patterned paper from the Flourish line.  
I added two scalloped borders in the sage green damask print to offset the blue a bit. 
A doily was applied to the center of the card front. A banner was hand-cut and layered on top of the doily. A large scallop oval was die-cut to mat the solid blue oval (also included in this collection) and stamped Happy Anniversary to the center.
Final touches include embellishing with pearls, 
satin angel wings, paper roses and a multi-loop bow.  
Again, please visit Cupcake Cards and Crafts to check out this new 
gorgeous line of papers called Flourish.

I hope you will join in the fun with us this month at The Cupcake Craftoom .

We look forward to seeing what you create with this layers challenge. 

Thanks for visiting me today! 
~Tammy~
{Recipe}
Paper: CS: Stampin' UP!, PP: Cupcake Cards and Crafts: Flourish
Ink: Momento,
Other: Dies:PTI, Spellbinders, Pearls: K & Company, Seam Binding: Ebay, Flowers: Michael's, Doily